Create and manage Virtual Hard Disk
Create and manage Virtual Hard Disk.
Windows Server 2012 Hyper-V provides several ways to create virtual disk files. You can create them as part of a VM or create them at another time and add them to a VM.
Virtual Hard Disk also allow to attach Host computer and store the data.
Steps to create Virtual Hard Disk.
> Log on to the server running Windows Server 2012 using an account with administrative privileges.
Click on Server Manager ikon on the desktop.
> In Server Manager window click on Tools and select Computer Management option.

> In Computer Management window select Disk Management option.

> Click on Action tab and select Create VHD.

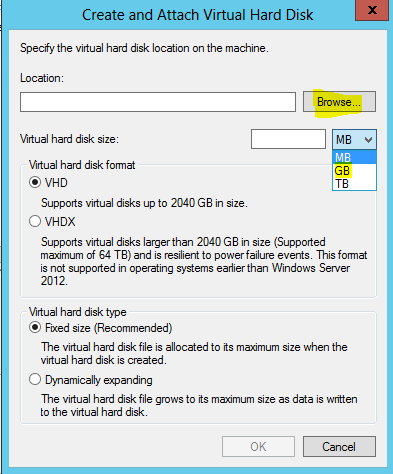
> In Create and Attach Virtual Hard Disk window select Virtual hard disk size: in GB and click on Browse... option.
> Select Hard drive where you want to create Virtual Hard disk and specify Virtual Hard disk name.
Than click on Save button.

> Define Virtual hard disk size: in GB and click on OK button.

> Virtual Hard Disk creation process start now.

> Once Virtual Hard Disk is created. Right click to the drive and select option Initialize Disk.

> Select GPT partition table and click on OK button.

> Right click on Unallocated partition and select New Simple Volume...

> Click Next > to continue.

> Define Maximum Disk space size in MB: format and click Next > to continue.

> Assign Drive letter to Virtual Hard drive and click Next > to continue.

> Format the disk in ( FAT32 / NTFS / ReFS ) and click Next > to continue. I have selected NTFS file system in this lab.

> Click Finish to continue.

> Virtual Hard Disk is ready to use. Find the following screenshot ( Disk 1 is a virtual hard drive ).

> In My Computer windows Virtual Hard Disk display with drive letter E: which is now ready to use for data.

Detach VHD Drive.
> In Computer Management window right click to Virtual Disk and select Detach VHD

> Click OK to continue.

> Virtual Hard Disk is detached now and not able to view in Computer Management.

Attached Existing VHD drive.
> In Computer Management window click on Action button and select Attach VHD

> Click on Browse... button

> Select Virtual Hard Disk from your C: / D: drive and click on Open button.

> Click OK to continue.

> Virtual Hard Disk ( Disk 1 ) is attached now and visible in Computer Management.

EOF


Comments
Post a Comment